Apply Image in Photoshop stamps your image destructively, but in a controlled way onto the item you have selected. The image can be a merged copy of all layers, or a single layer. You can stamp it to a blank layer, an image or to a Layer Mask. You can apply the image to individual channels and mask individual channels. This opens up many creative possibilities for selectively masking and applying effects to just part of an image.
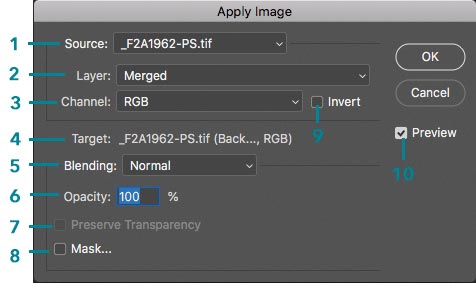
Apply Image Panel
From the Image Menu click Apply Image. This gives you several options -
Source. The name of the file. There is a drop down list but this only lists other open files which have exactly the same dimensions.
Layer selects either Merged or your can select a single layer. If you select an Adjustment Layer the Channel changes to Layer Mask.
Channel normally selects RGB to effect all colours but you can select red, green, blue, filter mask and transparency.
Target is a summery of what is happening.
Blending selects the Blending Mode used. If you use Multiply you can use Apply Image repeatedly to progressively darken the effect.
Opacity is adjustable and visible with the Preview on.
Preserve Transparency.
Mask produces more options if selected.
Invert the image to create a negative.
Preview is best enabled to see the effect live. Click it on and off to see the before and after effect.
Information
You can use Apply Image with only one layer to stamp an image onto itself, however this is destructive. However, if you first make a copy of the image and use Apply Image to stamp to that, then you can use a mask to mask out areas you do not want to change, and Opacity and Fill to control the intensity of the effect as well as different Blending modes.
Apply Image can be used repeatedly to increase the effect, which just builds up.
It can be used to stamp the background image to a mask, which creates a pixel perfect mask to selectively mask out shadows, so that if you have a Solid Colour Adjustment Level, you can apply the image to its mask and it will selectively mask out the highlights. Using the Multiply blend mode repeatedly on the same mask darkens the mask with each application and increases this effect. The mask can be inverted to apply this effect to the shadows. (Ref).
It can also be used to mask colour channels to emphasise colour, and by clicking the Mask this effect can be masked out of other colour channels. (Ref)
You can Dodge and Burn using Apply Image to create highlight and shadow masks to automatically select the areas to dodge and burn.