A Selective Colour Layer is the first choice to remove colour casts and create a normal skin tone. Each colour can be individually adjusted, and lightened or darkened by using the black slider.
Matching Skin Tones
General
Lightness and colour are the things to look at when matching skin tones. Adjust brightness first then colour separately. Ref.
Matching skin tones can be done by eye or more accurately using the Info Panel.
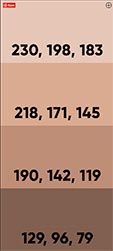
Skin tones reference charts can be seen by searching Google for 'skin palette photoshop'.
See Affinity Photo which seems to make this process much easier.
Use Curves and Hue/Saturation
Cut out the reference skin to a new layer on top of the stack and put it beside the skin to alter.
Remove the colour by creating a Hue/Saturation Adjustment Layer above everything, and reducing Saturation to zero.
On the Curves Adjustment Layer use the eyedropper to select a shadow and click and drag up or down with the hand tool to match tones. Delete the Hue/Saturation Adjustment Layer to return the image to colour.
Mask the areas if necessary.
Adjust the colours in the shadow areas using curves.
Create a Hue/Saturation Adjustment Layer and reduce Saturation if necessary. Ref.
Pratik Niak uses a blank layer set to colour blend mode. Sample the colour you want to use and paint over the areas you want to change. Alternatively, to reduce the redness ass a HSL layer and reduce the red colour and then mask it into the image where it is needed.
Brighten Dark Skin Tones. Dark skin tones are often unsaturated and need more than brightening. Go to Image > Adjustments > Shadows/Highlights. Brighten the shadows and bring up the colour. -To brighten the highlights use a Curves Adjustment Layer and drag the midpoint up, then use a mask to only apply this to the subject, and use Blend If to only apply to the highlights. -To fine tune the skin apply a Hue/Saturation Layer, and increases saturation a little. Add a Selective Colour Layer and select reds and use the sliders (More cyan, more magenta, less yellow here). (Phlearn).
Use a Solid Colour Adjustment Layer with a peachy colour, or select a skin tone from the image. . Select and mask the skin area. Use a Blend Mode of Multiply and change the Opacity. Use Blend If to remove the colour from the highlights if needed. 01,
Make skin milky white - Use a Black and White Adjustment Layer to remove colour. Can also add Curves if needed. 01,
Make skin chocolate brown - Use a Black and White Adjustment Layer in Multiply Blend Mode. Can also add Curves or Hue/Saturation if needed. 01,
Paint over lime green at 1% flow to neutralise the colour?
Pale Porcelain Skin
Pale porcelain skin - Apply a Hue/Saturation Adjustment Layer. Change the second drop down menu from Master to Yellow. Adjust the lightness slide to make the yellows lighter. Do the same with the reds. Play with the range slider points at the bottom to fine tune this.
The Skin Tone Tool in Capture One is often recommended by portrait photographers as a particularly good way of evening out and matching skin tones. Ref. Ref.