The Levels Adjustment Layer is a non destructive form of the Levels Adjustment for adjusting the lightness and darkness of the whole image or individual colour channels within that image. It does this by creating its own adjustment layer.
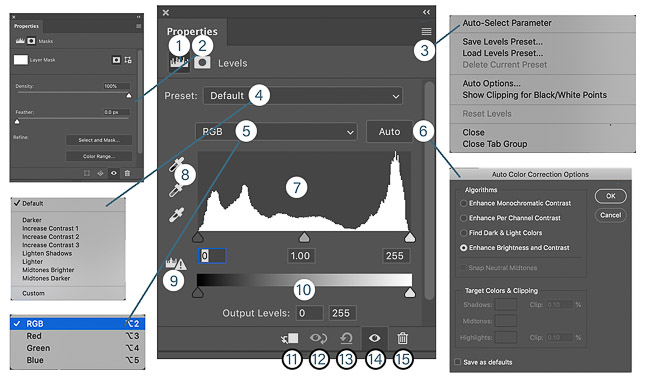
Properties Panel
Levels Adjustment icon.
Mask. Click here to change to the Mask Properties as shown.
Menu. Click to open as shown.
Presets Panel. Click to see the drop-down options as shown.
Channel Selector. Click to see the drop-down options as shown.
Auto. Click for an Auto adjustment of Levels, or OPTION + CLICK for the Menu as shown.
The Histogram Panel.
Eyedroppers. Use these to set the Black (Top), Grey (Middle) and White (Bottom) points respectively.
Warning. When the warning triangle shows it indicates that the Histogram is an estimate and may not be entirely accurate. Click it to sample again from a full image and it will disappear.
Greyscale Bar. This shows the tone of each point on the Histogram.
Clipping Mask. Click this to Clip this layer to the Layer below, so that it only effects that layer.
Before Icon. Click and hold to show the state before using Levels.
Reset. Click this to reset Levels to the original state.
Layer Visibility. Click to toggle on and off.
Trash. Click to delete this Layer.
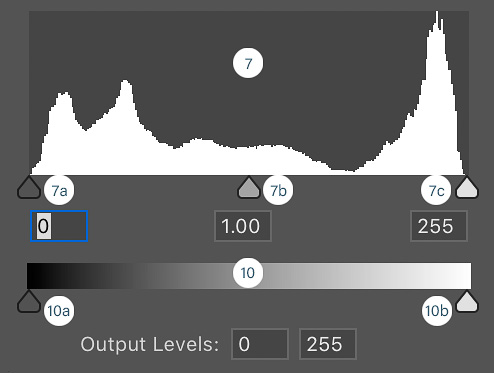
Adjustment Sliders
7. The Histogram. This is a Bar Chart with the height of each bar representing the amount of tone for that level on the Greyscale. The highest value always reaches to the top.
7a. Black Point Adjustment Slider with its numeric tone value shown below.
7b. Mid Grey Adjustment Slider with its numeric tone value shown below.
7c. White Point Adjustment Slider with its numeric tone value shown below.
10. The Greyscale Bar. This shows the tone of each point represented on the Histogram above it, and the actual value of tone that the sliders are at.
10a. Black Point Output Adjustment Slider with its numeric tone value shown as the first value in the Output Levels below.
10b. White Point Output Adjustment Slider with its numeric tone value shown as the first value in the Output Levels below.
How to Adjust Levels
If you move your Black Point (7a) to the right, then everything to the left of this will be pure black. This is ideal if your Histogram shows that there is no true black in the image.
Similarly moving your White Point to the left will make everything to its right pure white.
While moving either Black Point (7a) or White Point (7c) keys if you press and hold the OPTION key the image will change to show the areas which have reached Maximum Black or Maximum White values. This is really useful to see where these points are and adjust the points so that no important detail is lost in the shadows or highlights.
The overall brightness of the image is controlled by the Mid Point Slider (7b).
The Eyedropper Tools (8) can be used to set the Black (Top), Grey (Middle) and White (Bottom) points respectively. However, once set these limit the Black Point (7a) and White Point (7c) sliders to make it difficult to get back to resetting these values.
If you don't want a pure black in your image you can move the Output Black Point Slider (10a) and the Maximum Black will then be reduced, and the actual value is shown in the Output Levels Box. Similarly with the Maximum White Point.
Adjusting Colour
The RGB drop-down list (5) can be used to select either the Red, Green or Blue Channel.
If you choose the Red Channel, then moving the Black Point (7a) removes red from the blacks and causes the shadows to go cyan. Similarly moving the White Point (7c) introduces reds into the highlights.
Similarly moving the Black Point Output Slider (10a) introduces red into the shadows, and moving the White Point Output Slider removes red from the whites and causes the highlights to turn cyan.
These effects are quite broad and lack much control, however you can use Blend If by Double Clicking on the Layer to mask this effect to specific tones more precisely.