Location
- Photoshop > Windows > Layers > Create new fill or adjustment layer >
- Photoshop > Menus > Layer > New Adjustment Layer >
Information
- The Curves Adjustment Layer is a very versatile feature, which can be used to do many different things.
Shortcuts
- OPTN + Click on the bottom sliders shows the areas with no detail.
- SHIFT + CLICK allows you to select more than one point on the Histogram so that they can be moved together.
Window
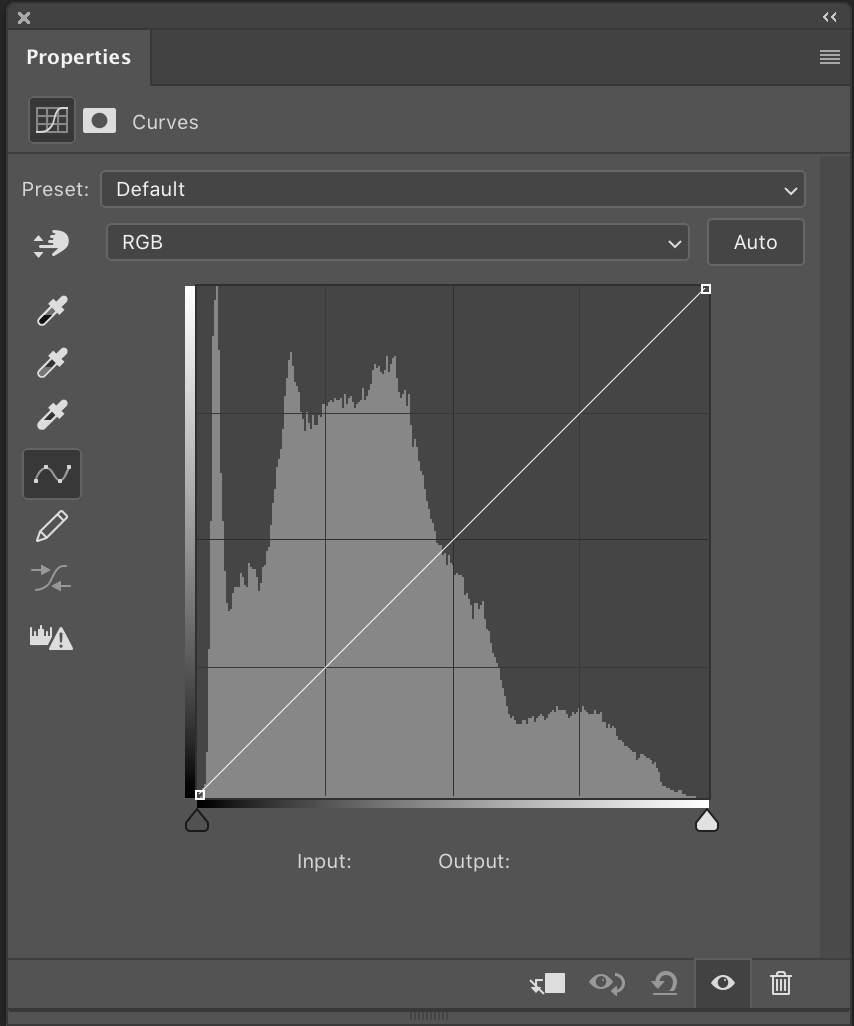
The Histogram
- Horizontal axis is the input, vertical axis is output. So to lighten shadows move the shadow point up.
- Can take colour casts out of an image by editing each channel separately to bring the white point and black point to the lightest and darkest points in the histogram. 01,
- Using OPTN + dragging the Black or White slider shows the clipping points where black or white areas start to appear. Ignore the colours as these are just saturation clipping.
Top Icons
- Auto -
Side Icons
- Hand - Click and drag finger on the image to modify the curve. The point appears as a point on the curves, which can be adjusted up and down with the cursor, or use the UP and DOWN arrow keys to make small adjustments.
- SHIFT + CLICK with the Hand Tool adds a Sample Point to the Information Menu, however these are only visible while the Hand Tool is active.
- Sample the black point
- Sample the grey point
- Sample the white point (Press Opt to display clipping preview)
- Edit points to modify the curve
- Draw to modify the curve
- Smoothe the curve values
- Calculate a more accurate histogram
Bottom Icons
- Create clipping mask
- View previous state (or \)
- Reset to defaults
- Toggle layer visibility
- Delete adjustment layer
Menu Options

Auto Options

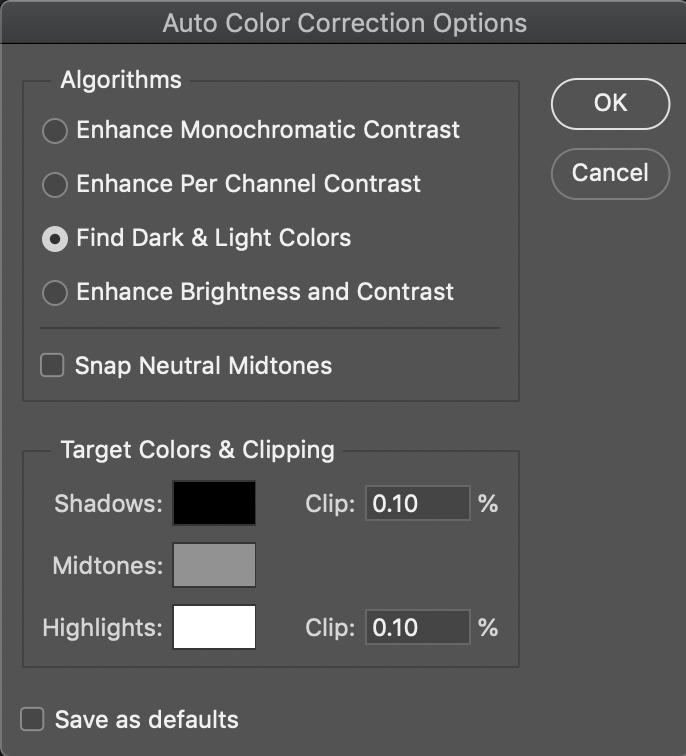
- The Auto button holds a lot of options. Ctrl + Click opens the options, or get to it from the top right menu.
- The default setting is shown on the left, which is usually not that useful.
- If you change this to the setting on the right, then this makes the Colour Pickers much more useful. Ref.
- However, to make it even better as a colour correction tool, select 'Snap Neutral Midtones' to colour correct the whole image using an automatically selected approximation to the best midtone value.
- The Clip setting 0f 0.1% finds a small blob rather than a point.
- The settings created here are those used in Auto Color.
Resources
- Adobe Photoshop Mastery: Colour & Tone by Ben Willmore - Creative Live Paid Class 06 Warm & Cool Adjustments 27:40.
- Master Curves from Start to Finish in Photoshop by PiXimperfect
- Photoshop Curves Tool: 6 Techniques Every Photographer Must Know by Techradar article.
- Build Amazingly Creative Looks Using Curves in Photoshop by PiXimperfect video.
- Curves Adjustment Tricks - Colour Correction and Colour Marching - Photoshop Training Channel video.
- Curves - Comprehensive article by Natalia Taffarel.
- The Power of "Horizontal Curve" in Photoshop! - Video by PiXimperfect.
Techniques
- Milk and Chocolate Skin Colour in Photoshop by Nemanja Sekulic video and Make a metal-like or solarised effect on skin 01 (6:27),
- If there is space to the right of the curve with no tones in it you can drag the bottom highlight slider to the left to brighten the whole image. If you press the ALT key while you do this you will see the image detail shown up when you start to loose it. Ref.
Darks Lighter Darks Darker Lights Lighter Lights Darker
