Related Articles
Information
- White areas on a Layer Mask are transparent and black areas hide that part of the image completely. Grey areas partially hide the image.
- New layer masks are created white, which means they are transparent. Paint on them in black to hide parts of the image.
- If you create a Layer Mask while a Selection is active, then the Selection will be applied to the Layer Mask in black.
- You can paint on a Layer Mask in black or white while a Selection is active and the paint will only apply to the selected areas. Similarly you can add or subtract from an existing layer mask by doing this.
- You can create a new layer mask in black by holding down the ALT key while it is created. Black masks show nothing of the image. Paint on in white to reveal parts of the image.
- You can use all the destructive editing tools in Menu > Image > Adjustments to work on a mask as the non destructive Layer Masks are not available.
- You can apply a layer mask to the image. The option is in the menu which appears by right clicking on the mask. The mask then disappears.
- Regular layer masks show up in black and white and vector masks in grey.
- Apply a Layer Mask is available by right clicking the Layer Mask. This reduces the size of the image to the size of the mask and removes the layer mask. Great for just selecting a small part of the image.
- Apply Image can be applied to a Layer Mask by first selecting the mask and then Menu > Image > Apply Image. Any effect is then selectively applied to the lighter areas.
- The Properties Window for a Layer Mask has some useful options with sliders for Density and Feather, as well as shortcut buttons to Select and Mask and Colour Range Tools.
Shortcuts
- Use CRTR + A on the mask to select all, then ALT + BACKSPACE will fill it with black.
- CMD + I will invert a mask.
- To copy a layer masks onto another mask use ALT + CLICK and drag it to the new position to copy it over.
- ALT + Click opens the mask to view it and edit it and do this again to close it.
- SHIFT + CLICK toggles a mask on and off. When it is off it has a red cross over it.
- CMD + CLICK selects a mask and makes the selection live.
- ALT + Create Layer Mask produces an inverted layer mask, which is black, so nothing shows through.
- Q to enter Quickmask Mode which shows unmasked areas in red. Paint black to add more red mask and white to delete it.
Editing Layer Masks and Channels
- Layer Masks and Channels are just images that happen to consist of only black, white and shades of grey, and can be edited with many of the tools that other images can be edited with.
- The Levels Adjustment is usually the most suitable tool to edit the mask with, as you can control the white, black and mid-grey points with sliders to increase contrast.
- Clean up a mask using a brush in Overlay Blending Mode. If you paint with black it will selectively paint over the dark grey areas making them blacker and not touch the light greys or white areas. Similarly painting white over the light grey areas makes them whiter without affecting the dark greys and black. Hence you do not need to be particularly selective in where you paint.
Links From
Related Articles
Introduction
- The Gradient Map Adjustment Layer is a way of non-destructively adding a gradient map to an image to colour tone it. It is preferable to the similar Gradient Tool which applies a gradient destructively.
- One problem is that with Normal Blending Mode the brightness and contrast can be altered dramatically, however changing the Blending Mode to Colour only changes the colour values. Luminosity can also work well. Soft Light does not affect midtones, only shadows and highlights.
- Adjust the Opacity and Fill to control the intensity of the effect.
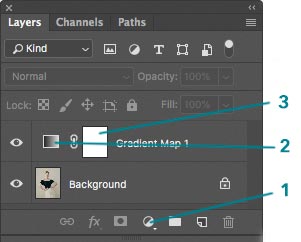
Adding a Gradient Map
|
|
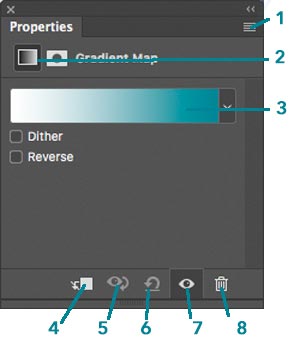
The Properties Panel
|
|
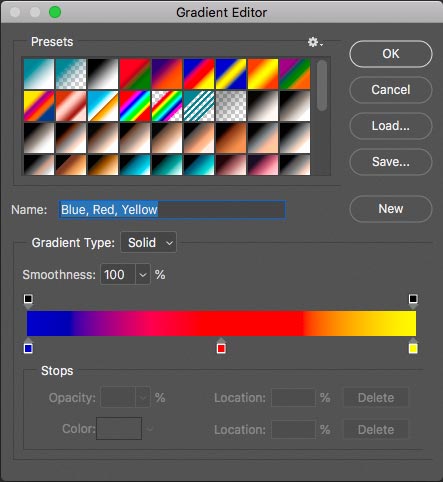
The Gradient Editor
|
|
Articles
- Gradient Map Versus Gradient Fill: What's the Difference? by f64 Academy
- How To Make Strong Black and White Images Using Gradient Maps, by SLR Lounge [Also B&W Conversions]
Videos
- How to Colour Tone Using Gradient Maps by Phlearn
- How to Colour Tone Using Gradient Maps, Instant Colour Grade in Photoshop by photoshopCAFE
- Take Full Control of Light in Photoshop Using Gradient Maps by PIXImperfect
- Soft Pink and Light Photoshop Tutorial using Gradient Map by Irene Rudnyk (4:20)
- Color Toning in Photoshop with Gradient Maps and Soft Light Blend Mode by f64 Academy, where he shares that if you make one of the colour points in your gradient equal to 50% grey, then this will become transparent when you apply an Overlay or Soft Light Blending Mode. Note that this can be applied to any point along the gradient.
- Using 3D Luminosity on Portraits with Photoshop - Video by PiXimperfect. Dodge and Burn using a Black and White Gradient Map, applied in Luminosity Blending Mode, and adjusts the points along the grey scale to control the luminosity.
Location
- Photoshop > Windows > Layers > Create new fill or adjustment layer >
- Photoshop > Menus > Layer > New Fill Layer >
Information
- To change the colour selectively, click the Hue, Saturation or Lightness button to have the vertical gradient select that option only, so that if you just want to change the Hue, click on that button.
Ideas
- Add a tint or haze by overlaying a solid colour. Use a blending mode of Soft Light for a tint and Screen for a haze. Adjust the Opacity to get the level of effect. Note dark and light colours have different effects. You can add the effect and then open the Colour Picker again and alter the colours in real time. Ref.
Location
- Photoshop > Windows > Layers > Exposure >
Information
- This isn't very good as bringing out extra detail by increasing the exposure. It is far better to do this by editing the RAW file in the Basic Pane of Lightroom's Develop Module.
- The Offset slider produces a faded effect if moved to the right.
Location
- Photoshop > Menus > Layer >
Fill Layer Types
- Solid Colour ... This is covered in Windows > Layers > Adjustment Layers > Solid Colour
- Gradient ... This is covered in Windows > Layers > Adjustment Layers > Gradient
- Pattern ...
